Have you ever wondered how to configure local access to an externally accessible resource in your network, via the same domain name? Simple example is a NAS storage. In my case Synology DS918+. After setting up SSL on *.synology.me domain, I realized that I cannot access the NAS locally via the same domain name, only by IP. But accessing by IP gives me SSL related errors. Each part of the solution was not difficult to find. There are just a few dozen moving parts. In my case the weak spot was Linux knowledge, and relying on command line, as I am generally a GUI fan. Purpose of this article is to help connect the dots. Feel free to skip over the parts you already know.
Disclaimer: Proceed at your own risk. I am not responsible if you break your router, your local computer, or any other devices on your network. Some level of system/IT knowledge is expected, in order to understand and correctly follow the steps. Below is a table of contents for this article. If reading any of it intimidates you, please let someone else do the configuration for you.
- Install Merlin Firmware
- Enable JFFS on Router and Reboot
- Enable SSH on Router
- Install Putty on Client
- Create Hosts File on Router
- Reboot Router and Test
- Flush DNS Cache on Client
- Disable SSH
Install Merlin Firmware
Merlin firmware is based on Asus standard firmware, improving stability and adding features, in this order of importance. You can grab the latest release version for RX-AX88U here. Other versions can be found on Merlin’s website.
Firmware can be flashed via:
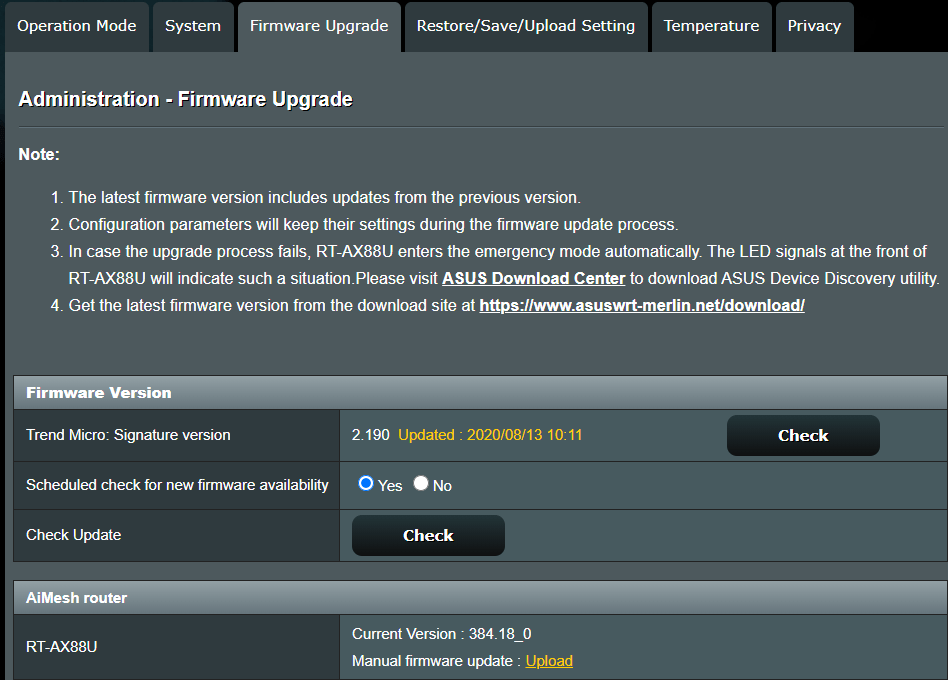
Administration -> Firmware Upgrade -> Manual firmware update -> Upload
I am attaching a screenshot of the area, because the UI can be a little confusing. Below is a screenshot of my router already running Merlin firmware. When it was on Asus firmware, it was not completely obvious that “Upload” link was the right option.
Enable JFFS on Router and Reboot
JFFS is one of the features of Merlin firmware. It allows you to store various configuration data that persists after reboot. We will be using it to store the custom hosts file.
To enable JFFS, after logging in to your router, navigate here:
Administration -> System -> Persistent JFFS2 partition
And change the second option Enable JFFS custom scripts and configs to Yes. Scroll down and click apply.

Enable SSH on Router
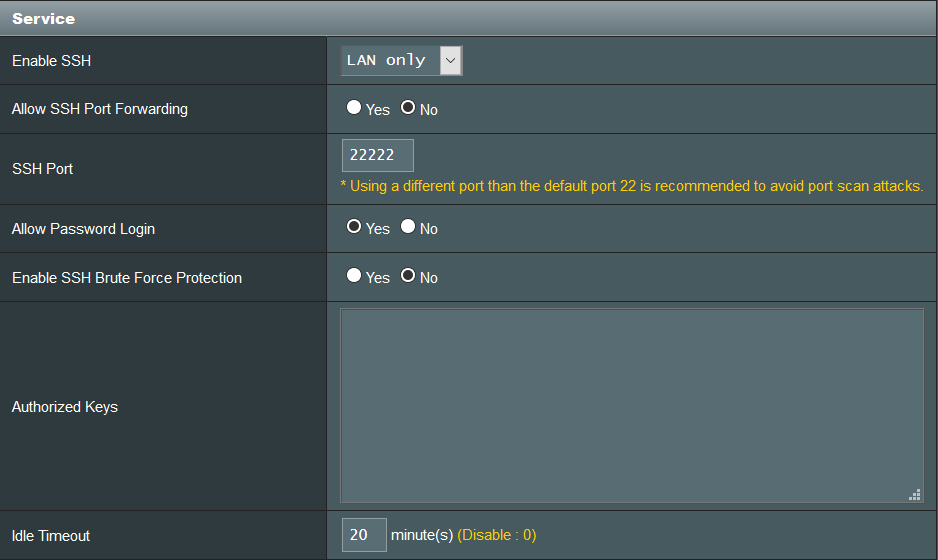
Assuming you are still logged in to your router, go to the following configuration section:
Administration -> System -> Service -> Enable SSH
Here set Enable SSH to LAN Only, and set port to something other than default 22. For example, 22222. It is not required to change the default SSH port, but it’s a good practice to prevent port scan attacks, even if they are highly unlike in a home network environment. Just a good habit.
Install Putty on Client
You can use any telnet client for this, I will be using Putty. Connect to router.asus.com - very convenient, no need to remember the IP, port 22222, if you are following this guide, or any port of your choice. Enter username/password as prompted.
If this is the first time you are using Putty or telnet, you might notice that caret position does not change when typing the password. Might appear as weird behavior for windows users, but here it’s fine. Do not be alarmed if does not seem to react to keystrokes. Also if you make a mistake, you cannot use backspace, and would need to start over.

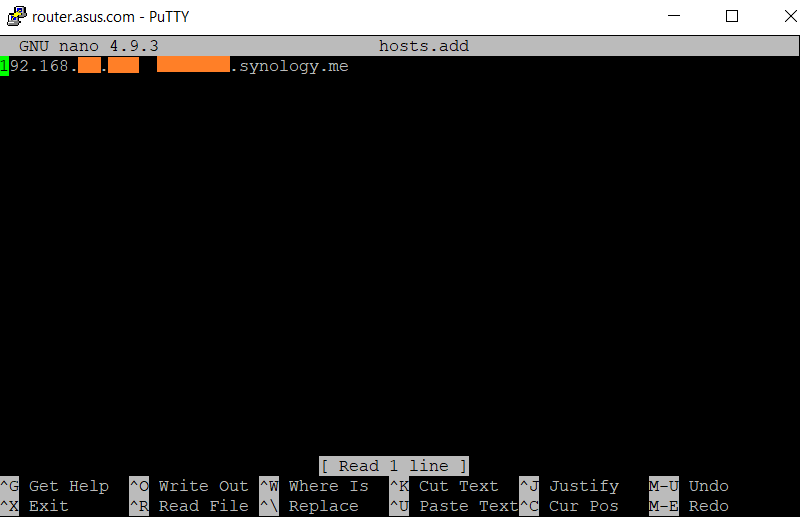
Create Hosts File on Router
Once connected to the router via telnet, navigate to /jffs/configs/. You can type cd /jffs/configs/ and press enter. Next, create the hosts.add file. There are multiple ways of doing it, I find it simple to use the built-in nano editor. Type nano hosts.add and press enter. Put your desired hosts entries in the following format:
(IP)(space or tab)(hostname)
For example:
192.168.1.50 something.synology.me
In my case I just needed one entry. Follow prompts at the bottom to save. All functions are based on control key. For example, Ctrl+X to exit, it will prompt for file name and save.
References:
- Create Dynamic Custom Hosts File - Asuswrt-Merlin @ SNBForums
- Network Administration: The Hosts File @ Dummies
- Which command I can use to edit a file in putty @ DigitalOcean
Reboot Router and Test
After disconnecting from the telnet session, reboot router and test to make sure your newly configured DNS name works correctly when accessed from the local network.

Flush DNS Cache on Client
If it does not work, you might have to flush dns cache, which is done using the following command:
ipconfig /flushdns
It needs to be executed in client’s command prompt (WIN+R -> cmd -> enter).
Reference: Reset an Internet Connection (Flush DNS) @ Pearson
Disable SSH
This step is optional and depends on if you need SSH for other purposes. If you do not need SSH for anything else, it is a good idea to disable it to prevent unauthorized access to your router.
